12 Days of Christmas – Day Ten with Koren – Comment to Win

Welcome to Day Ten of the 12 Days of Christmas Designer Series!   

The designers have put together 12 days of holiday ideas.   The goal is to help you get ready!

We also want to give you  the chance to win a YNS Store gift certificate!   All you need to do is leave a comment on the 12 Days of Christmas posts right here on the YNS Blog to be entered in the draw.   The grand prize is a $25.00 YNS Store gift certificate and two runner ups will each win $10.00 YNS Store gift certificates, the winners will be chosen randomly among all the comments left on the 12 Days of Christmas posts.   The more 12 days posts you comment on, the greater the odds of winning.   All comments must be left by December 8, 2017 and the winners will be announced on December 10, 2017.


Now let’s pass it over to Koren Wiskman who is sharing a treat with you today!

Hello fellow card makers and crafters

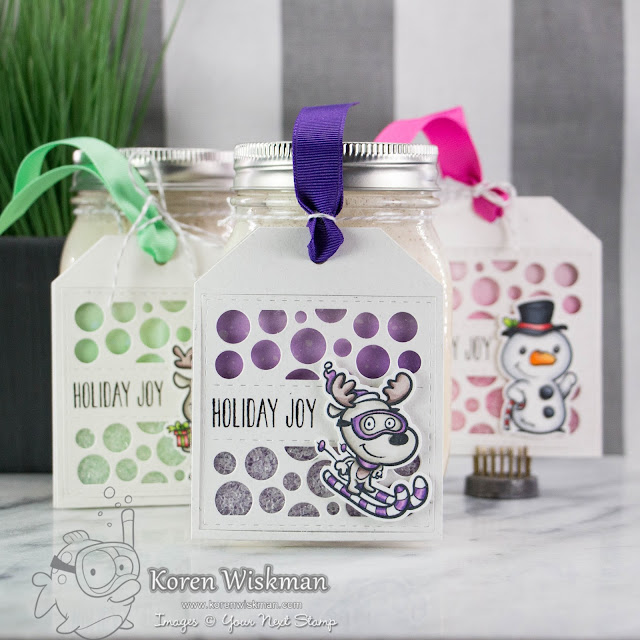
Today is super special. Not only do I have a paper-crafting project for you, but also, I am sharing my semi-homemade recipe for Egg Nog.  Don’t run away, it’s more like a milk shake than homemade Egg Nog. This is a tried and true recipe and you can make it with or without alcohol. Adults and kids alike will love this around the holidays. So, we are going to make some, package it up and put a pretty tag on it using Your Next Stamp products. Lets get started!

First, lets make the semi homemade Egg Nog. Here is a list of the ingredients you will need and brief explanation of how to mix them together. It isn’t hard. You can also watch me make this recipe in the video I created to go along with this post. Check for the link to it down below.

Semi-Homemade “Adult” or kid friendly Egg Nog… remember to omit all of the alcohol to ensure that the egg nog is kid friendly. I have made this recipe both ways. It tastes like a special holiday milkshake when you leave out the alcohol. Also, I love to use Turkey Hill brand products for my family. You may or may not have those available in your area. 

Ingredients:
Turkey Hill Vanilla Bean Ice-cream 1 – 1 1/2 quart container (my grandmother used to use the Egg Nog flavored Ice-cream, which is also seasonal, but my family prefers Vanilla Bean) 
Turkey Hill Egg Nog (seasonal) 1 – 1 quart 
Sugar – 1 cup (granulated) 
Cinnamon (to taste) – about 1 tbsp 
Nutmeg (to taste) – about 1 tbsp


Alcohol:
3/4 cup Bourbon 
3/4 cup Brandy 
3/4 cup Rye 


Tips before we get started-
Do not whip or over mix your ingredients. The egg nog will begin to froth, and you don’t want that. Slowly stir only.
 

1. Start with your ice-cream closer to room temp. This well help mix all the ingredients well. 
2. add your egg nog. 
3. add sugar
4. add alcohol if making “adult” egg nog. 
5. add cinnamon and nutmeg
6. enjoy!  


– the more expensive the alcohol the better the taste, but it is not needed. The cheap stuff will do. This recipe can be frozen. Also, some of my family members like to add an additional shot of Grand Marnier to increase the alcohol content. Be careful, it tastes good, but it will kick your butt! -consider yourself warned! 


YNS Supplies:  Holiday Buddies stamp and die sets | 3 x 3 Circle Panel Die

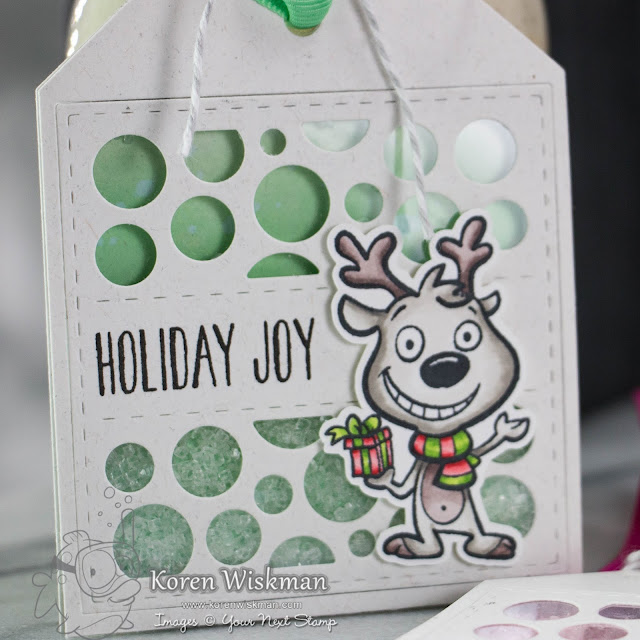
As for the tag, I started with an off white almost light gray in color cardstock with natural fibers and a vellum coating. I die cut a tag die that best fit with the Your Next Stamp Mini Circle Die. I stamped the sentiment from the Holiday Buddies stamp set with Versafine Onyx Black ink. Then cut a piece of acetate with the same tag die and adhered them together with Ranger Multi Medium Matte. I trimmed both the back and the front of the tag down by about 2 inches to be more of a square tag than a rectangle.


To create my shaker I adhered foam adhesive strips in a square along the outside of the inlaid Mini Circle die on the front of my tag, then added large sugar crystals. I cut a square 3 inches by 3 inches which creates the perfect backing to my shaker bits. I used Distress Oxide inks in Wilted Violet, Cracked Pistachio, and Picked Raspberry to ink-blend an ombre of color and also sprinkled it with a light dusting of water to create that distressed look we all know and love. That piece was attached to become the backing of my shaker bits.  I adhered the back of the tag with tape runner adhesive.


My images were pre stamped with Your Next Stamp Black Olive ink and colored with my Copic markers. I popped them up on the bottom right corner with foam adhesive. Ribbon and twine were added to the tag to attach it to my Ball jars filled with Egg Nog. For more in depth information and a video of me and my family making the egg nog, click the video link above.

These Ball jars full of Egg Nog will be given out to my friends and family during the holiday season. I deliver them to coworkers and hand them out to people that come to visit throughout the month of December. I usually make a double batch before Thanksgiving and another before Christmas. My husband demands that I set him aside some for his birthday on Dec. 27th. It is usually gone by the New Year.

I hope you all have a happy and healthy holiday season and a fantastic new year! Don’t forget to leave a comment to be entered for a chance to win!

Koren

FacebookPinterestTwitterEmail

12 Days of Christmas – Day Nine with Julie – Comment to Win!

Welcome to Day Nine of the 12 Days of Christmas Designer Series!   

The designers have put together 12 days of holiday ideas.   Our goal is to help you get ready!

We also want to give you  the chance to win a YNS Store gift certificate!   All you need to do is leave a comment on the 12 Days of Christmas posts right here on the YNS Blog to be entered in the draw.   The grand prize is a $25.00 YNS Store gift certificate and two runner ups will each win $10.00 YNS Store gift certificates, the winners will be chosen randomly among all the comments left on the 12 Days of Christmas posts.   The more 12 days posts you comment on, the greater the odds of winning.   All comments must be left by December 8, 2017 and the winners will be announced on December 10, 2017.


Now we will pass the blog over to Julie Elak…

Hi Everyone!

Today I have a gift for a hostess or anyone you would like to give a little something before the holidays.  At the beginning of the school year I purchased several rolls of gift wrap from my children’s school fundraiser.   What to do with all that paper I purchased?   Add some mini cards and dress it up, turning it in to a gift!  Luckily, the new Drink Tag die is the perfect size to fit over a roll of gift wrap.

Scroll on down for all the details on making your own tag and mini cards, plus a few tips!

Supplies:

YNS Supplies:  Drink Tag die set | Frosty Friends stamp and die sets | Waddles – Winter Wonderland stamp and die sets | 3×3 Snowflake Panel Die | Double Stitched Hills Die Set | Envelope Die | Scrapworks Strips Die Set

Other Supplies:  3 sheets 8.5 x 11″ lightweight card stock for envelopes | 2 sheets 8.5 x 11″ card stock for mini card base| 1 sheet 8.5 x 11″ card stock for snow panel die cuts | 1 sheet 8.5 x 11″ card stock for tag | scraps for snowy hills, strips and decorating | Zig Water Color Brush Markers | Water Brush Pen | Hole Puncher | Ribbon | Plastic Bag |  strong tape and other adhesive

Mini Cards – directions:

1 – Cut out six card bases, 3″ x 6 ” and score at the 3″ point to fold in 1/2.

2 – Die cut 6 snowflake panel dies.   Tip #1 – it is easiest to keep the card stock in the die and then pop out all the snowy pieces using a needle or a piercing tool.3 – Stamp and color desired images, then die cut each out.   Tip #2:  line up the dies around each stamped image, then use painter’s tape to hold the die in place while running it through the machine. 4 – Cut out snowy hills and strips from scraps to decorate cards.  Stamp sentiments as desired and determine layout for front of each card.

5 – Stamp sentiment inside each card.  Tip #3:  If you have a sentiment that you love but it does not fit exactly where you want it, then carefully cut it apart using sharp scissors. This sentiment used to be 2 rows and after a few snips it will now be 3 and fit inside the cards.


6 – Adhere Snowflake panel die cuts to card bases, then add strips, hills and stamped/die cut images.  The Scrapworks Strips die set is the set I use more than any other!


7 – Die cut 6 envelopes.  Assemble envelopes using super sticky tape, with a strip at the bottom and on one flap.   Add a strip of tape to close the envelope and leave the paper on that one so that gift recipient can insert the cards first.

Tag – Directions:

1 – Die cut 2 tags.   To make the tag stronger, these will be glued together later in the steps.

2 – Die cut 1 Snowflake Panel.

3 – Die cut 1 snowy hill from scraps.

4 – Cut out a 3.25 x 3.25″ card stock for mat.

5 – Cut out 3 x 3″ white card stock to layer behind Snowflake panel.

6 – Stamp sentiment at bottom of one tag and then decorate tag, layering as desired.   Adhere a second tag to the back of the first to reinforce it.


Tag and Bag of Card Assembly Directions:

1 – Place all cards and envelopes in a clear bag and tie ribbon around top.

2 – Punch 2 holes at the top of the tag and thread ribbon from bag through each hole, then tie a bow to secure bag to tag.

The Drink Tag Die is so versatile!

Thanks for stopping by today and visit us again tomorrow for Day Ten of the series.

Be sure to leave a comment before you go to be entered in the drawing to win one of 3 YNS Store gift certificates.   If you missed any of the other days go back and leave a comment on each of those posts too.  The more days you comment on, the greater the odds that you may be the winner!

Happy Stamping!

Julie

FacebookPinterestTwitterEmail

12 Days of Christmas – Day Eight with Sue – Comment to Win!

Welcome to Day Eight of the 12 Days of Christmas Designer Series!   

The designers have put together 12 day of holiday ideas.   Our goal is to help you get ready!

We also want to give you  the chance to win a YNS Store gift certificate!   All you need to do is leave a comment on the 12 Days of Christmas posts right here on the YNS Blog to be entered in the draw.   The grand prize is a $25.00 YNS Store gift certificate and two runner ups will each win $10.00 YNS Store gift certificates, the winners will be chosen randomly among all the comments left on the 12 Days of Christmas posts.   The more 12 days posts you comment on, the greater the odds of winning.   All comments must be left by December 8, 2017 and the winners will be announced on December 10, 2017.


Sue Taylorhill is sharing her project with you today…
Good morning and welcome to the Your Next Stamp November Designer Series!
We have twelve wonderful days filled with projects to share with you!
Today is Day Eight and MY day to show you what I have been working on!
Now that my daughters are a bit older, one of their very favourite things to do is to come home from school on a cold day and make hot chocolate!
They have their special mugs (so there is no fighting!) and love to try different flavours.
So my project today is a Hot Chocolate Dispenser!
I used the adorable stamp set, Hot Cocoa Phoebe, the Winter Plaid paper, 
and some YNS awesome dies to decorate a box dispenser!!
And here is how I created this!

I started off by cutting the box out using a cut file and my  Silhouette machine.   I picked the plaid papers I wanted from the paper pack. I cut the green one to fit perfectly on the lid of the box.

I then gathered up some supplies I would need to make this box happen!
My Hot Cocoa Phoebe Stamp Set and Black Olive Ink.
I stamped out Phoebe and The Snowman onto Copic paper.
Did you know you can stamp with this ink and then use your Copic markers right away??
Awesome right?

Next, I cut out two hills using the Double Stitched Hill Die Set. Then I stacked the two hills onto some of the Winter Plaid paper and then cut it out using the Stitched Square Dies.

I thought the scene need a few more things so I used the Tree Line Border and
cut off some of the trees to tuck into the hills.

I used my Copic markers to colour Phoebe and the Snowman and then used the
matching dies to cut them out!

I tucked the Snowman into one of the hills and used foam tape to bump up Phoebe.

Next I assembled my box using a strong red tape.

Lastly, I adhered the front panel onto the assembled box.

And here is the final project!

I also tucked in some special Candy Cane hot chocolate!
Hope you enjoyed my tutorial today and thank you for taking the time to look!   Be sure to leave a comment before you go to be entered in the draw to win one of 3 YNS Store gift certificates.   Let us know your favorite cold weather beverage!
Have a wonderful day!
Sue
The fun continues tomorrow…get ready for Day Nine!
FacebookPinterestTwitterEmail

12 Days of Christmas – Day 6 with Deborah – Comment to Win!

Welcome to Day Six of the 12 Days of Christmas Designer Series!   

The designers have put together 12 day of holiday ideas.   Our goal is to help you get ready!

We also want to give you  the chance to win a YNS Store gift certificate!   All you need to do is leave a comment on the 12 Days of Christmas posts right here on the YNS Blog to be entered in the draw.   The grand prize is a $25.00 YNS Store gift certificate and two runner ups will each win $10.00 YNS Store gift certificates, the winners will be chosen randomly among all the comments left on the 12 Days of Christmas posts.   The more 12 days posts you comment on, the greater the odds of winning.   All comments must be left by December 8, 2017 and the winners will be announced on December 10, 2017.


Deborah Anton is sharing a home decor project with you today for day six.  Scroll on down and learn more!

Happy Monday and Cyber Monday!

I am hosting Day 6 of the YNS 12 Days of Christmas Series and today I am sharing with you a project that you can create for the holidays using some cute stamps from Your Next Stamp.

I created a “family photo” of sorts using Holiday Buddies.  These cuties were easy to make into a photo op and you can even take it a step further by decorating the outside of the frame.  That was what I was going to do, but realized I did not have any fun holiday dies small enough to decorate without covering the images.  So, I left it as is and decorated the inside with a few gumdrops and star sequins. 

YNS Supplies:  Holiday Buddies stamp set | Stitched Rectangles

I used my MISTI to stamp the images on each of the Stitched Rectangles before coloring them in with Copics.  I measured out the patterned paper, which is an 8.5″ x 11″ piece, to create 9 separate windows.  I placed strips of black card stock to glue over the paper before placing my images where I wanted them. I sponged a little distress ink around the edges to take out some of the brightness from the white card stock before adhering the images down.  

If making a frame is too much to create, you can always create small canvas art using your images like you can find HERE from a previous post I did on how to use your stamps on canvas.  This makes for cute little pictures around the house.

I hope you enjoyed this photo op project and don’t forget to continue checking back on the YNS Blog everyday to see what each DT member created for this series.  Thanks for popping in and hope you have a great week!!

Don’t forget to leave a comment before you go!   Let us know how you like to decorate your home or your funniest holiday photo…share with us and be entered in the draw for one of 3 YNS Store gift certificates.

Happy Stamping!

Deborah

FacebookPinterestTwitterEmail

12 Days of Christmas – Day Five with Cassie – Comment to Win!

Welcome to Day Five of the 12 Days of Christmas Designer Series!   

The designers have put together 12 day of holiday ideas.   Our goal is to help you get ready!

We also want to give you  the chance to win a YNS Store gift certificate!   All you need to do is leave a comment on the 12 Days of Christmas posts right here on the YNS Blog to be entered in the draw.   The grand prize is a $25.00 YNS Store gift certificate and two runner ups will each win $10.00 YNS Store gift certificates, the winners will be chosen randomly among all the comments left on the 12 Days of Christmas posts.   The more 12 days posts you comment on, the greater the odds of winning.   All comments must be left by December 8, 2017 and the winners will be announced on December 10, 2017.


Now we are going to pass this post over to Cassie Tezak

Hi, all!  Today I’m sharing my project for the Your Next Stamp 12 Days of Christmas series. I’m your designer for Day 5.

Now, nine times out of ten you will see a card for my design team projects, but today I wanted to go a little above and beyond my norm and make a really fun holiday advent calendar to kick off the season. Here’s a look!

002

I used a standard box die to make each day’s compartment. I die cut out twenty-five boxes and put them together in preparation for this. At the top edge of the box opening I stamped the snowy layer that is on each of the trains in the Santa Express Train Carts set using some simple masking. I used VersaMark Ink and heat embossed white embossing powder over top.

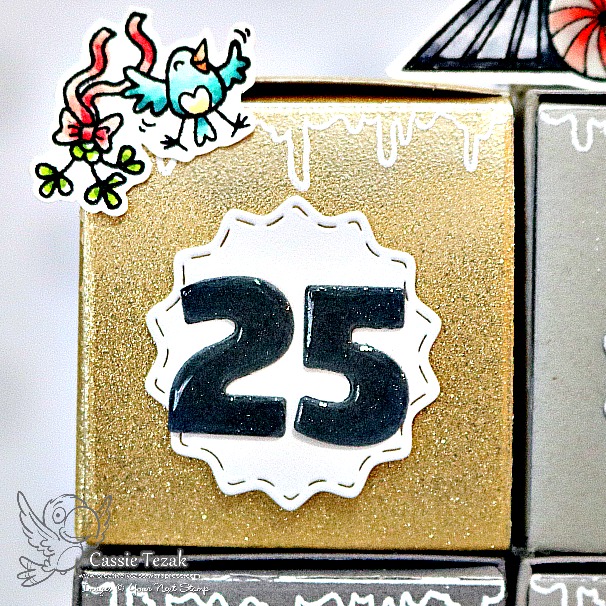
The numbers were die cut using The Bold Numbers Dies, and I used mostly gold glitter paper, except for the 25th which was done in the same dark gray as some of the boxes. I highlighted the numbers by putting the smallest of the Wavy Circle Dies cut out of white paper behind them.

aaa


013

These cute little boxes are just big enough to hold little treats and goodies. Another awesome idea is to add some holiday bucket list “to dos” in some of the boxes. Some of the things going on my holiday bucket list are: bake cookies, watch Elf, decorate the tree, and taking some holiday photos, but you can put whatever it is you like to do at the holidays!

005

Next I grabbed a bunch of different stamp sets that I knew I wanted to incorporate into this cute little train scene at the top of my calendar, and stamped them on Neenah Solar White card stock. I stamped them in Black Olive ink because I was going to be using my Copics. I used the sets: Santa Express, Santa Express Train Carts, Birdie Banner and Plan the Holidays. All of these pieces were colored in and cut out.

008

To make the trains stay popped up I cut little strips and bent them in half, attaching one half to the box tops and the other to the train wheels. It creats a pop up kind of look. For those pieces that look like they are kind of floating I cut strips of acetate to make it look like the birds were flying above the carts. I’ve seen a lot of people do this on those shadow box projects, and I really wanted to give it a go! I love the effect that it gives.

To finish off the card I added some shimmer pen and Glossy Accents, because I love both to add some extra details to projects.

dddd

Here’s a close up look at that golden day! Can you believe it’s almost December?? I can’t! I feel like it should still be October. I had so much fun making something other than a card today, and I hope you enjoyed it too!

Be sure to leave a comment before you go.   What kinds of things would you put in an advent calendar if you had one? I think my family can expect some fun treats this season 🙂

Thank you so much for stopping by! I will see you again soon with another card!

-Cassie

FacebookPinterestTwitterEmail

12 Days of Christmas – Day Three with Laura – Comment to Win!

Welcome to Day Three of the 12 Days of Christmas Designer Series!   

The designers have put together 12 day of holiday ideas.   Our goal is to help you get ready!

We also want to give you  the chance to win a YNS Store gift certificate!   All you need to do is leave a comment on the 12 Days of Christmas posts right here on the YNS Blog to be entered in the draw.   The grand prize is a $25.00 YNS Store gift certificate and two runner ups will each win $10.00 YNS Store gift certificates, the winners will be chosen randomly among all the comments left on the 12 Days of Christmas posts.   The more 12 days posts you comment on, the greater the odds of winning.   All comments must be left by December 8, 2017 and the winners will be announced on December 10, 2017.


  Laura Nehring is taking over the blog today and sharing a fun project for you to make that kids of all ages will enjoy!  Here is more from Laura…
Hello everyone!
I put together a cute Indoor Snowball Fight Kit!
     
   
I think this is such a fun little gift idea, perfect for when the kiddos are on winter break from school! And since we don’t get real snow in Southern California, I know my kiddos will enjoy this indoor version! 🙂
I had planned on making my own pom-poms, but lucked out when I came ascross these premade ones at Target! They’re so fluffy!! I put them into a metal bucket, and added a cute tag.
   
 
I needed a more rectangular shaped tag to fit the snowman, so I cut a second tag out of white felt, cut the lower portion off with the Double Stitched Hills Die, and adhered it to the lower part of the paper tag to cover the stitching. I backed it all with a solid piece of cardstock, and I was able to customize the size for exactly what I needed!
  
   
Copics:
Scarf, Hat – B06, B05, B04, B02, B00
Buttons, Hat, Nose, Mouth – T10, T8, T6, T4, T2
Tongue – R30, R000
Eyes – BG0000, C00
Sign – E59, E57, E55, E31 and T1, T0
  
  
Good luck, and thanks for visiting!!  Don’t forget to leave a comment before you go!   Share your favorite snow activity with us or simply say hi!
We will see you back here tomorrow for Day Four.

Happy Stamping!

FacebookPinterestTwitterEmail

12 Days of Christmas – Day Two with Wendy – Comment to Win!

Happy Thanksgiving to all our friends in the United States of America!

Now on to Christmas!   It’s Day Two of the 12 Days of Christmas Designer Series and our November guest, Wendy Price has taken over the blog!

Throughout the series, the designers will be sharing ideas for the holidays.   Our goal is to help you get ready!

We also want to give you  the chance to win a YNS Store gift certificate!   All you need to do is leave a comment on the 12 Days of Christmas posts right here on the YNS Blog to be entered in the draw.   The grand prize is a $25.00 YNS Store gift certificate and two runner ups will each win $10.00 YNS Store gift certificates, the winners will be chosen randomly among all the comments left on the 12 Days of Christmas posts.   The more 12 days posts you comment on, the greater the odds of winning.   All comments must be left by December 8, 2017 and the winners will be announced on December 10, 2017.


Day Two is a gift that you may just want to keep for your self!
 Wendy shares how to bring the snow inside with a snow globe filled with Santa and a reindeer from the Merry and Bright stamp set.
Supplies:  Merry and Bright stamp set  | Merry and Bright die set | Globe | Fake Snow | Adhesive
Directions:
1. Stamp and color images. Die cut the stamped image and 2 additional blank shapes for each image. 
2. Cut thin strips to act as brace for the stamp images. Fold in half and score.
3. Adhere die cut images, sandwiching thin strips in between. Layering 3 pieces of card stock adds stability to the shapes.
4. Cut circle to fit in bottom of snow globe. Cut slits for brace strips to slide through.
5. Slide strips through the circle and adhere strips.
6. Adhere circle to the bottom of the snow globe lid.
7. Add fake snow or glitter to the snow globe and close.
8. Shake and enjoy!
 

Don’t forget to leave a comment before you go!   What stamp set would you use inside your own snow globe?  What is your fave?

We will see you back here tomorrow for Day Three.

Happy Stamping!

FacebookPinterestTwitterEmail

12 Days of Christmas – Day One with Lisa – Comment to Win!

Hello everyone and welcome to Day 1 of the 12 Days of Christmas November design team series!

Over the next 12 days, the designers will be sharing ideas for the holidays.   Our goal is to help you get ready!

We also want to give you  the chance to win a YNS Store gift certificate!   All you need to do is leave a comment on this post to be entered in the draw.   The grand prize is a $25.00 YNS Store gift certificate and two runner ups will each win $10.00 YNS Store gift certificates.   The more 12 days posts you comment on, the greater the odds of winning.   All comments must be left by December 8, 2017 and the winners will be announced on December 10, 2017.


Lisa Lara kicks off the series with a trio of candy cane cocoa kits decorated with the Treat Topper die set.

Lisa’s design is colorful without requiring any coloring!   The solid topper lets the candy and cocoa inside the pouches provide the burst of color.


Embossing the stamped images on the topper makes each image stand out.    No coloring also means you can pull these together fast.   Fast is definitely the way to go when making multiple toppers.

YNS Supplies:  Treat Topper Die SetWarm Christmas Wishes Die SetWaddles – Winter Wonderland 

Don’t forget to leave a comment before you go!   Are you making gifts this year?   Do you emboss like a pro?   What is on your Christmas wish list?   Share away or simply say HI!

We will see you back here tomorrow for Day 2 with Wendy.

Happy Stamping!

FacebookPinterestTwitterEmail

Colorful November DT Dare – Comment to Win

We have colorful Christmas creations for you today!

The Design Team and guests were challenged to use their favorite Christmas color combination for this month’s Design Team Dare!    

Your challenge is simply to leave a comment and tell us your favorite holiday color combo!   One random comment will be selected as the winner and that person will win a stamp set of their choice.

 Scroll on down to check out the design team and guests creations featuring November new release items.   When you get to the end leave a comment for a chance to win a YNS stamp set of your choice.   

DTDare2candy

Leave a comment on this post by November 17th and you will be entered in the draw.   The winner will be announced on November 19th, right here on the YNS blog. 

Scroll on down to see how the guests and team interpreted the challenge, from traditional to pastels, there are lots of faves to choose from! 

***

Kate, November Release Guest
***

Kendra 

Wendy, November Guest

***

Please leave a comment before you go for your chance to WIN a YNS stamp set of your choice!  Let us know your favorite color combo!

You have until November 17th at midnight EST to leave a comment and be entered in the draw.   The winner will be announced on November 19th.

Thank you so much for stopping by!

Karen

Save

Save

Save


Save

FacebookPinterestTwitterEmail

October Inspiration Continues with Lisa Lara

Yes, you read the headline correct…the October inspiration continues with Lisa Lara.   Lisa missed the preview and release, but she has projects to share and we did not want you to miss out on her creativity!


Are you in the holiday spirit yet?

Happy Stamping!

FacebookPinterestTwitterEmail

© 2024 Your Next Stamp. All Rights Reserved.