Well howdy there, YNS fans! It’s me, Susan (susiestampalot) and it’s time for another monthly installment of my SUSIE-Q FUN TIP! This month, I’m expanding on how I make “grounding” using my Copic markers for some of my stamped images. Ya’ll can’t leave them floating around in space, now can you? It just gives your focal point more of a “setting” and completes the image.
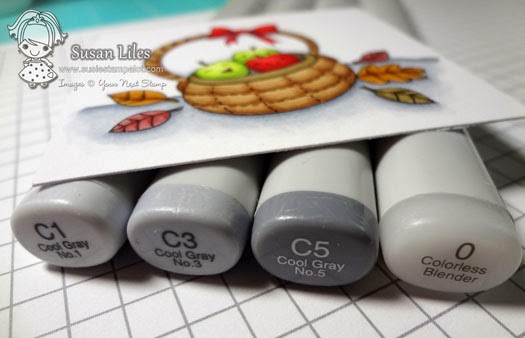
Now, just so ya’ll know, I’m no expert in Copic coloring. I just do what I do’s. I’m sure there are plenty of other ways to get the job done for creating “ground” out there, but this is just the way I do it, using C1, C3, C5, and my Blender. However, if you wanted it to be dirt or grass or Mars, you’d use a series of browns, greens or whatever color Mars is to make this work for you.
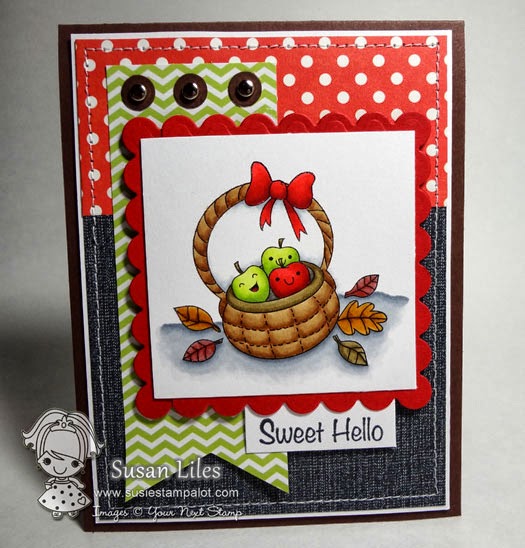
Today, the cutie patootie stamp set, Joyful Apple Basket is helping me out and modeling for us. I bet if ya’ll leave a comment at the end of this post, telling us how much you love it and what else ya’ll would like me to feature here, Karen will give one away! Just sayin’. Let’s get started…
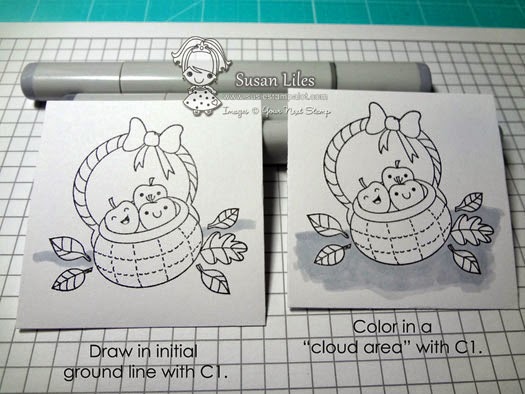
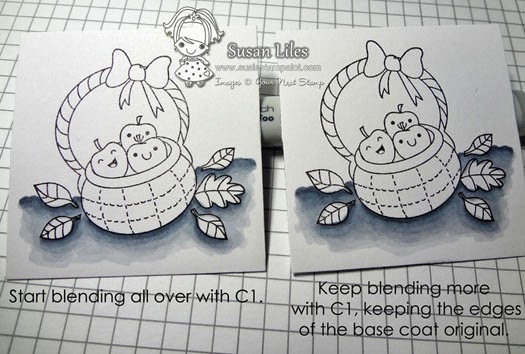
1. I actually usually color my image in first, but for the sake of this tutorial, just pretend the apple basket is colored. First you’ll want to decide where the ground should be. In this case, I wanted the leaves to be sitting on the ground along with the basket, so I brought it up a little high. I usually always make my image be a tad lower than my ground lines. Then start by drawing a line where the ground starts and coloring in a “base coat” both with C1. The base coat should just kind of make a “cloud” underneath your image, how ever big you want and leaving the edges of your cloud light (as in don’t go over this part a bunch.)

2. Using the C3, draw over the ground line and add some shadow under objects where a shadow would be. Blend this with the C1, being careful not to take the C1 all the way to the edges of your cloud so that your base coat is “one layered”.
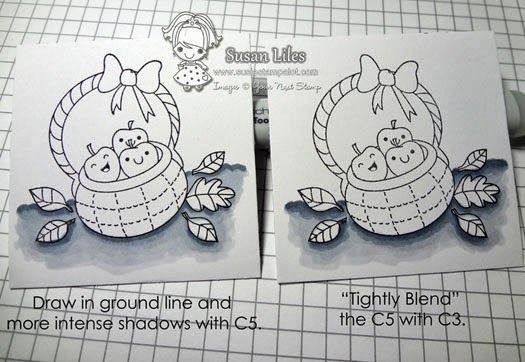
3. Use C5 and draw over the ground line again and add some more shadows where desired to intensify. Blend with the C3 carefully and close to the C5 only. In other words, don’t go really far out into your C1 area when blending this step. I call it “tight blending”. See how it looks roughly blended still?
4. Now go back with the C1 and blend, still keeping away from the original layer near the bottom and side edges of your cloud. Be sure at this time to slightly blend the C1 all the way up to the top edge of the ground and into the darkest shadows over your C5. (Don’t be scared going into the dark shadows, it’s not Halloween yet.)
5. See number 4 and blend it really well.
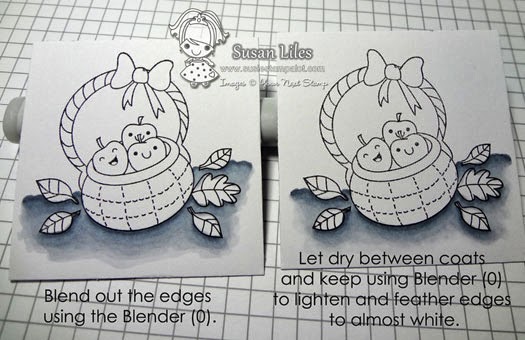
6. Lastly, use your Blender (0) to feather out the bottom and side edges of your cloud to almost white, using a circular motion. Don’t touch your C5 areas, or it will take the color away. It’s ok to use the Blender on your lighter shaded areas until you get the desired look. This will also make your dark areas seem darker. I think I went over this with my Blender 3 times. Let it dry a bit between each time you go over it. The blender sometimes keeps working until it’s dry, and you’ll be sorry if it takes out too much color all at once after all that work.

Are you going to try it?


Thanks Susie! It does help to “ground” your images. Learning here:-)
Great tutorial. I often get lazy and leave this grounding step out, but it sure does make a difference in how the final card turns out.
That was a great lesson! I know that I will be trying it out. Those apples are just too adorable!!!
Awesome tutorial. I will have to try that out next time. Luv this cute stamp.
Hugs
This stamp is adorable. The grounding adds so much to the finished project. Love the coloring.
Thanks for the great tutorial! I’m a newbie at the copic thing too! I don’t have any of the “C’s” yet, but I they are on my list now–they really make a difference in the final result! And the apples are too stinking cute!
way to go Susie…thanks for the great tips on grounding! what a super sweet card you created too!
Thank you Susie for tips. It sure makes the image look much better, even though it is awesome even as lineart 🙂
OK you always CRACK me up!!!! But I DID manage to pick up an Awww darn it out of this… I blend all the way to my edges of my “cloud”…. NOTE TO SELF… close to the edge of the cloud makes for a fall…. 😉
LOVE the tutorial and REALLY love that card. Apples are on my forever growing have to have list…. 😉
Wow Susie, I just learned A LOT! What a difference grounding makes to the image! It’s subtle but makes a big impact and something I must try now. I’m very new to Copics as well, so any tutorial is much appreciated. I love your finished card and think this would be great to leave on a desk of a teacher. Thanks again and I hope you have a wonderful holiday weekend!
Oh Susie you know I love your work and I agree to grounding my images. I 99% of the time do it. When I make my cards I always think what would Susie do to pop it.. I think I would like to see how you pop the card, I know you use lots of layers I love the black or dr colors to pop it and mix of dies. How do you figure it out? Thanks and love ALL of your work. Look forward always to Q-tips..
wow…love your colouring and thanks for the tips… i am still learning with my copics and love the tutorial 🙂
Thanks for the fun tip!
What an adorable image…those apple smiles just are too cute! love the colouring tutorial. Thanks.
Great tutorial. I try to ground my images but sometimes do not always do the best job with the edges. Thanks for the tip about the colourless blender.
love those cute happy apples.
Thanks for the great tutorial, I always have issues with shading so this really helps me! I love the apples they’re very cute!!
Great tips, thank you. Love this little basket.
Thanks for the great tip and your instructions were very helpful. I can’t wait to try this.
Kerry
mommakcrafts.blogspot.com
Cute stamp. I would love that in my collection. I really like your card. Thanks for the tips for grounding. As for something to cover I have been working on paper piecing elements of my stamps (ie clothing)to create dimension however I can’t seem to get it to work for me the way I have seen it done. Not sure what I am doing wrong or if it’s the images I am trying to work with.
These apples are adorable! Those little smiles are killing me 🙂
Your card is gorgeous and the grounding looks great — perfectly blended. Love it 🙂
-Annie Rose
Your card is so lovely and cheery. Stamp is as cute as can be. I don’t have Copics but I try to do the grounding effect with Prisma pencils. Thanks for your tutorials.
Thanks for the tutorial. It is surprising how much this adds to the card. I am just starting and need all the help I can get. Will try this.
Fabulous explanation–more like this would be appreciated to us newbie copic users.
slrdowney at hotmail dot com
I’m just entering the world of “grown-up colouring” and didn’t even know what “grounding” was until a couple weeks ago. Thanks for the great explaination of how to use different shades to achieve the effect!
order ativan pete wentz ativan overdose – buy genuine lorazepam
buy xanax online xanax side effects muscle twitching – xanax effects immune system
buy ambien online overnight ambien side effects muscle twitching – what is ambien medication
diazepam 5mg diazepam tropfen online kaufen – half life 10 mg diazepam
ativan cost ativan dosage to get high – ativan for flying
buy valium online buy valium online mastercard – valium for anxiety
diazepam 10mg best place to buy diazepam online – diazepam yahoo answers
buy cheap ativan symptoms of ativan addiction – ativan side effects fda
generic xanax 4 xanax and alcohol – xanax bars difference between white yellow
buy xanax online xanax side effects headache – xanax 50 mg
lorazepam 1mg reverse side effects ativan – ativan mechanism of action
ativan for sale snorting lorazepam 1mg – ativan side effects weight
diazepam 5mg buy valium diazepam – buy genuine valium online
l9g0aod7 http://www.isotretinoin4health.net/#buy-isotretinoin-online-no-prescription – isotretinoin no prescription isotretinoin online
buy valium india buy valium online no prescription mastercard – where to purchase valium online
generic ambien online long does 10mg ambien last – cant sleep ambien
xn7bl2d5 http://www.cheapisotretinoinforless.net/#purchase-accutane – buy generic accutane online buy isotretinoin
Topamax is the brand name of a generic drug called topiramate which is a seizure medication. This can be a big benefit for patients who suffer from these types of conditions, and will help in many other cases as well. [url=http://www.topamaxdiscount.com/]topiramate migraine[/url] Topamax is the brand name of a generic drug called topiramate which is a seizure medication. Originally, the drug was used mostly as an anticonvulsant, which helped both children and adults to get through some seizures.
In the United States an extended release capsule is available in 20 and 40 mg doses. In the United States an extended release capsule is available in 20 and 40 mg doses. [url=http://www.lowcostnexium.com/]generic esomeprazole[/url] Nexium (Esomeprazole) Information There are also oral Nexium that will offer more timely results than you can get with the capsules.
Propecia is a synthetic anti-androgen that works to inhibit the enzyme that changes testosterone to dihydrotestosterone and is only available by prescription. The men who did not take the medication at all continued to see hair loss. [url=http://www.utilsinbatcountry.com/]generic propecia 5mg[/url] Some side effects of this medication include but are not limited to: impotence, abnormal ejaculation, decreased ejaculatory volume, abnormal sexual function, gynecomastia, and erectile dysfunction. Unfortunately, when you cease taking the medication you begin to experience hair loss again within six to 12 months so the treatment needs to be ongoing to maintain the new growth.
– Headache, dizziness. http://www.mimmosabq.com/ – provigil online – Bruising, severe tingling, numbness, pain, muscle weakness. Provigil is used to treat excessive sleepiness caused by sleep apnea, narcolepsy, or shift work sleep disorder. – Antifungal medications.
Hello, b7d9h3s6 http://www.stratteraforsale.net/#strattera-drug strattera cost http://www.bestpricezolofton.net/#zoloft-without-prescription zoloft without rx
Hi http://www.bestpricemeds101.net/diflucan.html buy fluconazole no prescription http://www.effexoronlineprice.net/#effexor-for-sale cheap effexor online
Hi http://www.insomniapillsonline.net/ http://www.insomniapillsonline.net http://www.wm5fixsite.com/#buy-avanafil stendra without prescription
Friends, http://www.365discountmeds.net/ambien.html generic ambien http://www.soma4lesscoupon.com/#generic-soma-online order carisoprodol
Friends, http://www.yourcarinsurancelocal.com/michigan.html car insurance quotes detroit http://www.genericsoma4sale.com/#order-soma purchase soma
Friends, http://www.365discountmeds.net/valium.html diazepam 10mg http://www.yourcarinsurancelocal.com/california.html car insurance sacramento
Friends, http://www.365discountmeds.net/valium.html valium 10mg http://www.happypharmsales.net/ http://www.happypharmsales.net/
Friends, http://www.yourcarinsurancelocal.com/arizona.html car insurance arizona http://www.happypharmsales.net/stendra.html cheap stendra